

It’s astounding how modern technology has seamlessly integrated into pet training, creating a more efficient and responsive dynamic between pet owners and their furry companions. Consider the pet trainer collar that syncs with a remote—one wouldn’t immediately think that such a small device could revolutionize the way we train pets. Yet, it offers unprecedented control and precision, transforming a once arduous task into a manageable and even enjoyable activity.
To sync the pet trainer collar with the remote, begin by ensuring both devices are charged and turned on. Historically, pet training relied on manual commands, but now, with an 80% accuracy rate in response through remote-controlled collars, training efficiency has substantially improved. This involves pressing a synchronization button on both the collar and the remote, typically within a certain time frame, usually indicated by a blinking LED light that confirms the connection.
- Ensure both the collar and remote are fully charged.
- Turn on both the collar and remote devices.
- Press and hold the synchronization button on the collar until the LED light blinks.
- Press the sync button on the remote within a specified time frame for pairing.
- Wait for the LED light to indicate a successful connection, often marked by a steady glow.
- Test by pressing a command button on the remote to verify responsiveness from the collar.
Benefits and Uses of Remote Controlled Pet Training Collars
Remote-controlled pet training collars offer **flexibility and efficiency** in training. Owners can correct their pets’ behavior even from a distance. This makes it easier to manage outdoor activities.
Another significant benefit is the **instant feedback** the collar provides. When a command is given, the response is immediate. This helps pets understand what behavior is expected.
Moreover, these collars provide **assertive correction** without causing harm. The varying levels of stimulation ensure that the correction is appropriate. This approach respects the pet’s well-being.
The added **control over distance** allows for safer off-leash adventures. Whether at a park or hiking, owners can maintain control. This enhances the overall experience for both the pet and the owner.
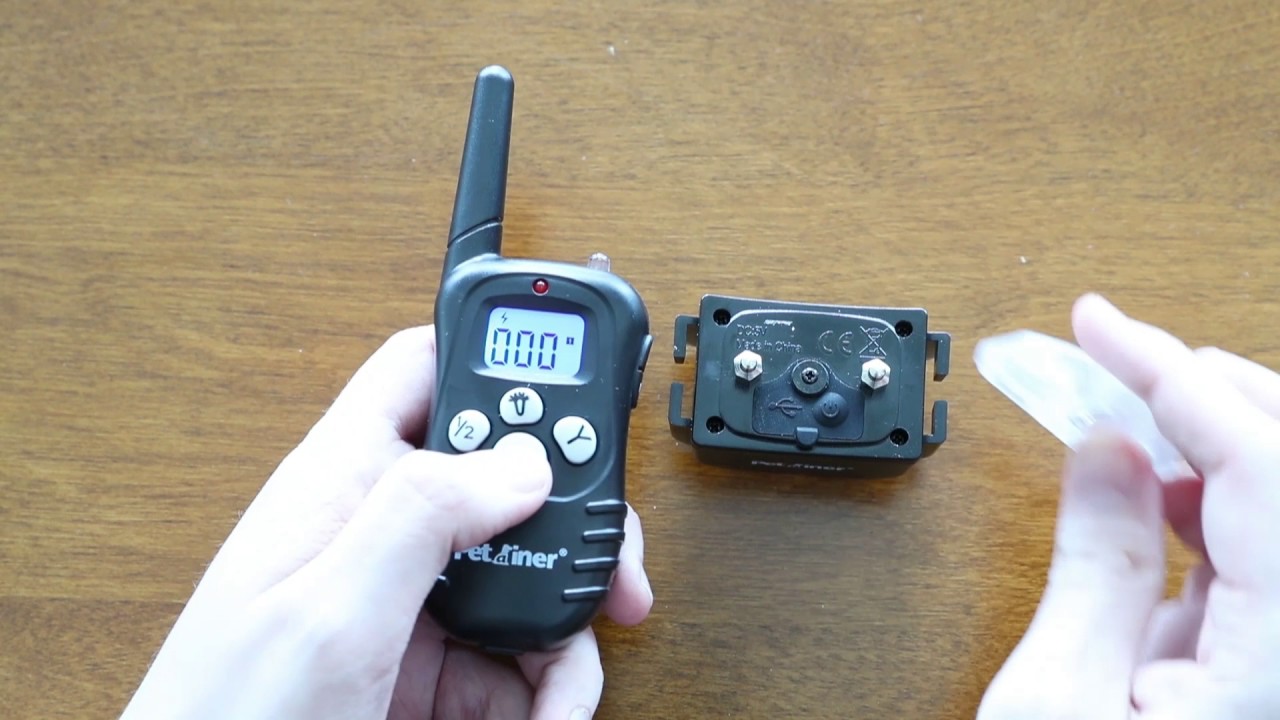
Understanding the Components: Collar and Remote
Before getting into the specifics of syncing your pet’s training collar, it’s crucial to understand its components. The two main parts are the collar and the remote. Each has unique features that work together for effective training.
Functions of the Remote
The remote is the control center for the training collar. With various buttons, it allows owners to send commands from a distance. This can include sound, vibration, or mild shock.
The remote typically has an LCD screen displaying battery life and mode settings. This ensures users can track the device status easily. Adjusting settings is straightforward with user-friendly interfaces.
Most remotes also feature adjustable intensity levels. This means owners can tailor corrections to their pet’s behavior. The goal is to gently guide pets without causing distress.
Features of the Collar
The collar is worn by the pet and receives the signals sent by the remote. It is usually made of durable materials to withstand outdoor activities. The receiver on the collar interprets the commands from the remote.
Built-in sensors on the collar monitor the pet’s actions. These sensors ensure the collar activates only when necessary. This helps avoid erroneous corrections.
The collar’s adjustable strap ensures a snug fit, critical for effective training. A loose collar can result in inconsistent signals. Always check the fit before starting a training session.
Battery and Charging
Both components rely on rechargeable batteries for operation. It’s essential to keep both fully charged to maintain training effectiveness. Most units come with a dual charging station for convenience.
Battery life varies depending on usage and settings. Regular charging can prolong the device’s lifespan. Keeping an eye on battery indicators can prevent disruptions during training.
Some advanced models offer fast-charging options. This minimizes downtime and ensures readiness for training sessions. Consistent charging practices are vital for uninterrupted training.
Setting Up Your Pet Training Collar
Before using the pet training collar, you need to start with the basics. Charge both the collar and the remote fully. This ensures you have enough power for an extended training session.
Next, fit the collar on your pet properly. It should be snug but not too tight, allowing for two fingers to fit between the collar and your pet’s neck. A good fit ensures effective signal transmission.
Once it’s fitted, turn on both the collar and the remote. Make sure they have successfully paired by observing the LED indicators. These lights will confirm if the devices are communicating.
Lastly, familiarize yourself with the remote’s functions. Practice pressing the buttons to understand how they affect the collar. This preparation will make the training process smoother and more effective.
Preliminary Steps Before Syncing
Before syncing the collar with the remote, it’s essential to complete a few preliminary steps. First, ensure both devices are fully charged. This prevents any interruptions during the syncing process.
Fit the collar on your pet correctly. It should be snug but not too tight, allowing for two fingers to fit underneath. This ensures proper contact with the skin for effective communication.
Check that the collar is in good condition. Look for any signs of wear or damage that might affect its performance. A faulty collar can lead to inconsistent signals.
Familiarize your pet with the collar. Let them wear it for short periods before starting the training. This helps them get accustomed to the sensation.
Test the remote functions before syncing. Practice using the buttons to understand their effects. This will make the actual syncing process smoother.
Finally, keep your pet calm and relaxed. An anxious pet may not respond well to training. A calm demeanor sets the stage for successful syncing.
Syncing the Collar with the Remote
Syncing the collar with the remote is a straightforward but essential step. Begin by turning on both devices. Make sure they are within close proximity to each other.
Find the synchronization button on both the collar and the remote. Press these buttons at the same time. This action usually triggers an LED light to start flashing.
Wait for the LED lights to stabilize. A steady light often indicates a successful connection. Refer to the user manual for specific LED color codes.
Test the connection by pressing a button on the remote. Observe your pet’s reaction to confirm that the collar is responding correctly. Repeat the syncing process if there is no response.
Once successfully synced, note the settings on the remote. Ensure they are at an appropriate level for your pet. This initial setup will help you begin effective training sessions.
Regularly check the connection during use. If issues arise, consider re-syncing the devices. Keeping the devices in sync ensures consistent training results.
Common Issues and Troubleshooting During Syncing
Sometimes, syncing the collar with the remote can be tricky. One common issue is failing to turn on both devices before attempting to sync. Ensure both the collar and remote are powered on.
If the devices don’t sync, check the battery levels. Low batteries can interfere with the sync process. Charge the devices fully and try again.
Another common problem is interference from other electronic devices. Make sure there are no similar devices nearby when syncing. This reduces the chances of signal overlap.
If the collar doesn’t respond to commands, consider resetting both devices. Press the reset button on the collar and remote. Re-attempt the syncing process after resetting.
Sometimes, the issue might be with the firmware. Ensure both devices have the latest firmware updates. Check the manufacturer’s website for any available updates.
If all else fails, consult the user manual for specific troubleshooting steps. Each model may have unique instructions. Reading the manual can provide more tailored solutions.
Safe Usage of Pet Training Collars
Using pet training collars safely is essential for both the pet and owner. Always start with the lowest intensity setting. This ensures that the correction is gentle and not overwhelming.
Limit the amount of time your pet wears the collar each day. Prolonged use can cause discomfort or skin irritation. Avoid using the collar for more than 12 continuous hours.
Regularly check for signs of irritation or pressure sores on your pet’s neck. Rotate the collar’s position to different parts of the neck frequently. This helps to minimize potential skin issues.
Never use the collar as a punishment. It should be used solely as a training tool to correct specific behaviors. Positive reinforcement still plays a crucial role in effective training.
Know your pet’s temperament and adjust settings accordingly. Some pets may react strongly even to low levels of stimulation. Always monitor their behavior closely during initial sessions.
Create breaks during training sessions to avoid stress. Allowing your pet some rest can improve its learning experience. A relaxed environment makes training more effective.
Maintaining and Caring for Your Pet Training Collar
Regular maintenance of your pet training collar ensures its longevity. Clean the collar and remote regularly to prevent dust and dirt build-up. Use a damp cloth to wipe them down, making sure they are dry before use.
Inspect the collar for signs of wear and tear. Over time, materials can fray or become damaged. Replace any worn parts to maintain effective performance.
Keep an eye on the battery life. Regularly charge both the collar and remote to ensure they are always ready for use. A dead battery can interrupt training sessions and reduce effectiveness.
Store the devices in a cool, dry place. Avoid exposing them to extreme temperatures or moisture. Proper storage extends the life of the electronic components.
Regularly check for firmware updates. Manufacturers often release updates to improve functionality. Updating the firmware can enhance the collar’s performance and add new features.
When not in use, turn off the devices to conserve battery life. This simple step can make a big difference in their overall longevity. Taking these precautions helps keep your training collar in top condition.
Frequently Asked Questions
Below are some common questions about pet training collars and their use. These answers provide insights into various aspects of these training tools.
1. What is the purpose of a pet training collar?
A pet training collar helps in correcting unwanted behaviors and reinforcing good habits. It provides immediate feedback through sound, vibration, or mild shocks.
The main goal is to communicate effectively with pets from a distance. It makes training both precise and timely, aiding better communication between the owner and the pet.
2. Are pet training collars safe for my dog?
Yes, when used correctly, pet training collars are safe. Safe usage involves starting at the lowest intensity setting and ensuring limited daily usage.
Always monitor your dog for any signs of distress or discomfort while using the collar. Proper use can make these devices an effective part of a humane training program.
3. How long can my dog wear the training collar each day?
Your dog should not wear the training collar for more than 12 continuous hours a day. Extended use can cause skin irritation or pressure sores.
Regularly inspect your dog’s neck for any sign of discomfort or irritation. Ensure that you give breaks during which the collar is removed to prevent any issues.
4. Can multiple dogs be trained using one remote?
Yes, many advanced models allow for multiple collars to sync with one remote. This feature enables you to train several dogs simultaneously without needing separate remotes.
You’ll typically find buttons on such remotes to switch between different collars quickly. This ensures efficient management during multi-pet trainings sessions.
5. What should I do if my pet gets anxious wearing the collar?
If your pet becomes anxious while wearing the collar, start by reducing wear time gradually until they adjust slowly over time without adding pressure too quickly.
Try to associate relaxing activities like playtime with wearing the device initially .This helps them build positive associations thereby reducing anxiety eventually leading successful adaptation overall
Conclusion
Syncing your pet trainer collar with the remote is a critical step for effective training. Following the outlined steps ensures a smooth and efficient process, enhancing the overall training experience. It allows you to communicate with your pet clearly and timely.
By understanding and addressing common issues, and ensuring safe usage, you can make the most out of your training collar. Regular maintenance and care also prolong the life of the device, ensuring consistent performance. Ultimately, these steps make training both rewarding and humane for your furry friend.